This three-part How-To carving series, just in time for the holidays, will guide you through the steps to Carve a Christmas Elf with accomplished multimedia carver and sculptor Justin Gordon of Groveland, Mass.
Part I - Blocking out the carving on the wood
Part II – Carving process
Part III – Painting and Finishing

A few tips from our instructor before carving:
BEVEL – Justin likes to put a forward bevel on his chisels (like the #9s and #11s) of about 10-15 degrees. This makes the carving edge stick out a little more at the cutting edge so he can get in deeper in tight areas.
STEADY – For safety and to keep his carvings free from “oops marks” from a slipped tool, Justin uses a thumb grounding tool hold. This means both thumbs are involved in holding the tool as much as possible. “If I choke up on a tool and the thumb holding the tool is touching my other thumb, this grounds the tool to the workpiece. If it slips, it only slips as far as my second thumb will let it,” he said. The second thumb also serves as a stabilizer in normal use, keeping the slips from happening and securing a good guide to the path of the tool.
STAY CLOSE – Justin’s advice is “to work from what I have towards what I need” – in other words, he carves adjacent areas to what he’s already carved in order to keep the details and proportions correct with respect to each other. In addition, reference materials are always nearby to check his work.
Now let’s start carving!
Remember from Part I, we learned that the blocking step locates the features. With the carving part, we will finish them.
RIGHT ARM
To begin, Justin carved in the back of the elf’s right hand and started the arm, keeping them close to the body.


EARS
Once he was happy with the position, Justin detailed the ears using the #5 x 3 mm. (Shown below, working on the elf’s right inner ear.)
He next turned the elf and made sure the ear on the left side matched, in both size and location, to the right ear, completing it in the same manner.

EYES
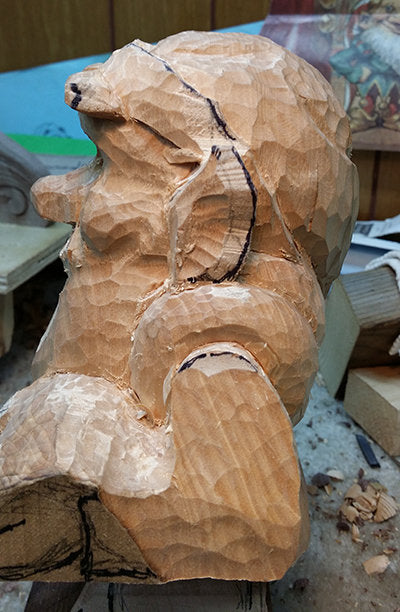
Justin roughed in the eyes and sides of the nose with a #9 x 5 mm.As a reminder of doing many features at once, Justin said, “To start the face, I also had to do the forehead, eyebrows and the top of the hat brim.”
After roughing in the face with the #9 x 5, Justin drew in the upper eyelid lines. “I carve them in nice and deep for a good shadow, making sure to go deeper into the corner of the eye socket next to the nose,” he said.
Then he drew in the eyeball lines, making a deep stop cut – only as deep as it needed to be. Using a knife, he took out the corners of the eyeball first. Next he lowered the eyeball surface and rounded the eyeball as round as it should be.
In order to make sure the lower eyelid is deeper than the upper eyelid, Justin carved in a little more and added a few wrinkles. He recommends checking your own eyes for reference to see how the upper eyelid sticks out more.

CHEEKS & MOUTH
For the cheeks, Justin rounded them out. “Make them big and round but set back from the nose,” he said.
From the reference picture of the elf, the bottom of the cheeks has a concave that receives the mouth. The mouth is also very convex, so Justin rounded off below the nose, deep into the cheeks. “This makes a nice round surface to make the mouth in. Check the side view for how deep the mouth goes into the cheeks.”


NOSE
Next Justin shaped the nose and nostrils, keeping them slightly recessed in the cheeks and mating nicely with the area over the lips.LIPS
From the reference picture, Justin saw that the elf’s lower lip sticks out slightly more than the top lip, so he drew the line a few times before he liked it.
Once drawn on, he carved the lip line, recessing the upper lip below the lower lip. He cut away the line under the smaller lower lip with a #9 x 5, then shaped the lips. “Make a deep but narrow groove between the lips for a nice shadow. I used my knife to do this – a V-tool just doesn’t get the shadow you want,” Justin shared.

SKIRT BELLS
Moving on to the bells on the bottom of the elf’s tunic, Justin blocked those out using a #5 x 8 mm because it closely matched the radius of the bells. “I took them straight in because I wasn’t clear on where the bells would finally end up. This gave me flexibility for the final location.”
Since a few details happen at once, while blocking in the skirt bells, it was a good time for Justin to take those bells deep enough to find the lower torso of the elf. He blocked them in, checking side view and front view to make sure the torso looked like it came out from under the skirt at the right angle, plus making sure the elf looked like he would properly balance when standing on a flat surface.


After blocking was complete, Justin rounded off the bells with a #3 x 3/8 and a #5 x 8 mm.This also gave him access to finish the lower torso down to the shoes and the underside of the skirt. Here he put in the wrinkles on the elf’s tights as he went, using a #9 x 5 mm, #5 x 3 mm and #11 x 3 mm. “I also made sure to give the elf a nice bum,” Justin laughed. “Lady elves like a nice bum.”

Justin’s cat Owen likes to hang out in the carving studio. This pic also shows some tool dings in the edges of the skirt tassels. Justin said, “You can imagine how difficult it was to dig out all that material under the skirt and shaping the torso. And somehow, by the grace of God, I didn’t break any of those bell tassels!”

SHOES
To start the shoes, Justin first carved a V-groove around the ankles so there would be a shadow there along with a concave top of the shoe on each side of the ankles. Next he penciled in the shape of the cuff bottoms near the bottom of the foot on both sides.
Then he carved the rolled-over cuff so it looked like a soft fabric. “The #9 x 5 mm had a nice radius to start most of these cuts. I finished with the #11 x 3 mm,” Justin instructed.
Finally, to locate the foot correctly, Justin drew the shoe footprint on the bottom of the carving. This served two purposes: to make sure the shoes would look right around the already carved ankles, and to make sure the piece would still be balanced to stand on its own on a flat surface.


After the cuffs were located and nearly finish carved, Justin finish carved one shoe. He put in top wrinkles, wrinkles around the sides to the bottom, put a nice undercut under the cuffs for the shadow and gave them an odd shape at the toes as if there’s a bunch of excess material in those stocking toes.
“How those shoes could be comfortable for elves, I just don’t know,” Justin chuckled.
This photo shows the back of the shoes with the wrinkles and cuffs. Notice the nice bum too!


LEFT ARM & HAND
In the pic below, you can see the left arm is just like the right arm. But in carving the left arm, Justin made sure the forearm stayed against the body so he didn’t have to carve behind it. In doing so, he prevented a free-floating appendage that might be easily breakable.
The two photos here also show the front and side views of the blocked-in hand. At this point in the carving process, Justin is closer to the final details of the hand where he carves each finger to length, locates the thumb so it’s secure and not too breakable, and determines the depth of the palm.


“Since the hand was just out there, I figured it would be useful in some way,” Justin noted, so as he was carving the hand, he decided to make it so a marble would fit in it. “It would be cool to put an engagement ring, jingle bell or some other small object in there too.”
First he used a #9 x 10 mm to carve the hand to fit the marble comfortably so it didn’t fall out when the carving is on a flat surface. He used his own hand in the same pose to get the wrinkles right, also adding fingernails and mating details of the beard piece on the palm, the shirt sleeve and the shirt under the arm. A #5 x 3 mm, 1.5 mm micro skew chisel and 2 mm V-tool were used in completing these steps.

BEARD
The reference picture shows the elf’s beard to have radial lines emanating from the mouth that get wider at the outside edges. Justin drew on some guide lines to keep his directions going the right way.
Justin started the beard hair process with a #11 x 3 mm to make grooves showing the hair lines. He then made more lines with the #11 and shaped the hair lines a little more defined.
Using a #9 x 5 mm, Justin made some wide grooves for the shadows at the outside of the beard and a few places near the middle, especially at the two places under the lips where there’s a bald spot on both sides of the middle hair, just under the lip.
Next he finished the beard with 4mm and 2mm V-tools to texture the grooves with nice hair lines. “Here you want to make sure the lines you carve have strokes that are as long as the hair lines are supposed to be. For the elf, I had to use long hair lines for a long beard,” Justin said.


He reminds carvers to always use “S” curves when carving hair. “There’s nothing worse than a nice face with spiked, straight hair lines.” He carves the “S” curves in and out of the grooves with “S” curve strokes that are also long cuts.
When texturing anything, Justin advises making sure you texture all of what’s to be textured. “If you leave any flat spots, the flat spots will pop up visibly when you paint the carving. Texture all that’s textured.”
At the ends of the beard, Justin cut in small V-cuts with a 2mm V-tool so the cut goes just up to the mating surface without touching and leaving a tool mark. He finished the V-cuts with the micro skew chisel and a knife so the beard hair has an irregular edge against all abutting surfaces.
Finally, Justin completed the carving process by finishing the stocking cap and its folds and wrinkles, the hat tassel and the elf’s eyebrows.

Here is the elf when all the carving is completed! Now he’s ready for paint.


SNEAK PEEK of Part III
TOOLS USED:
#9 x 5 mm - pfeil Swiss made #9 Sweep Gouge 5 mm, Palm Handled 05Y62
#5 x 3 mm - pfeil Swiss made #5 Sweep Gouge 3 mm, Palm Handled 05Y32
#5 x 8 mm - pfeil Swiss made #5 Sweep Gouge 8 mm, Palm Handled 05X11
#7 x 6 mm - pfeil Swiss made #7 Sweep Gouge 6 mm, Palm Handled (available as part of set 6-piece set 05V11)
#7 x 3/8 - Ramelson #7 Sweep Fishtail Gouge 3/8″, Palm Handled 09I04
#3 x 3/8 - Ramelson #3 Sweep Fishtail Gouge 3/8″, Palm Handled 09I02
#12 x 8 mm V- pfeil Swiss made #12 Sweep V-Parting Tool, 8 mm, Palm Handled 05Y01
#12 x 4mm V - pfeil Swiss made #12 V-parting Tool 4 mm (available as part of 6-piece set 05Y75)
#11 x 3 mm – pfeil Swiss made #11 Sweep Veiner, 3 mm, Palm Handled 05Y12
#5 x 1/4 - Ramelson #5 Sweep Gouge 1/4″, Palm Handled 09H04
1.5 mm micro skew chisel - Ramelson (available as part of 5-piece set 161371)
2 mm V-Tool - Dockyard 2 mm Micro Carving V-parting Tool (available as part of 5-piece set 17K21)


About Justin Gordon
Justin Gordon carves and sculpts in eight mediums – wood, sand, wax, snow, ice, stone, clay and foam. He concentrates on commissioned fine woodcarved figures, architectural carving, restorations, and custom clock cases. He teaches carving classes in Groveland and Randolph, Mass. See more of Justin’s work on his web site: www.ElwinDesigns.com and in our recent blog on his sand sculptures.
Stop in your local Woodcraft store, and let them help you with the tools, supplies and knowledge you need to start your next carving project.
Move on to Part III – the final in this series – to see the painting process and our completed Elf carving.
To see Justin's larger-than-life sand sculptures, check out this Woodworking Adventures blog - Fun in the Sun with Ultimate Sand Sculptures.

We hope you’ll be inspired!


