River tables are wonderfully unique, beautiful and functional works of art, but the cost to buy one is often beyond what most people can afford. The amazing, limited-edition “River Collection” tables by Washington-based Greg Klassen, for instance, can run as high as $10,000 for a dining table. These high-end beauties feature colored glass and natural edge wood to look like topographical maps of lakes and rivers from above.

The Denver Woodcraft store recently hosted a class to teach students how to make their own version of a natural-edge river table. Instructor Brendan Whitehead (pictured here), who has worked at the Denver Woodcraft store for nine years, has made several tables in this style after his wife saw one and wanted it. “I couldn’t afford the one she saw, but I knew I could make one,” Brendan explained.
Interest in his river tables grew, and he has since taught classes on them and sold several. He also teaches Knife Making, Hand-Cut Dovetails, Hand Plane Use, Router Basics and Festool introduction classes. Hand tools and Festool are two of his specialties. He said he has been woodworking as long as he can remember.
Class Prep
In preparation for the class, Brendan met with the two class participants about four weeks prior to help them pick out the slabs for their tables. Since this is a very personalized workshop, Brendan prefers instructing just a few people at a time. Students in this class must already have some woodworking experience. Eric Bridenbecker of Aurora, CO, chose an ambrosia maple slab, and Mike Maldrow of Golden, CO, selected a walnut board.
Once the boards were selected, Brendan did some work before the class took place. This included splitting and milling the boards flat and square and making a template out of MDF for the glass portion of the table. The template was created by following the edge pattern of the boards when they were flipped, with rough edges towards each other. A glassmaker cut the glass for the two tables.
Class Day - Friday/Saturday
The River Table class generally takes place over a Friday evening, all day Saturday and all day Sunday. The Friday session was an overview of theory, design, finishing and safety. On Saturday, Brendan, Mike and Eric were ready to get to work. The halves of the slab of wood were placed on a flat surface and spaced out to allow room for the customized glass to go in between at the width necessary for the “river” to fit.
Next the guys traced around the edges of the glass onto the wood. This is where they created a line to become the “lip” where the glass would set down on the wood. Using this line, they freehand routed along the edge of the wood, essentially creating an uneven rabbet.
Routing both halves of the table took most of Saturday, as this step required a lot of test-fitting to ensure the glass would set properly within the grooves.
As seen here, Eric has both halves of his table routed out and the glass fits down in the allocated area. It’s important to note that the glass is free-floating, allowing the wood to expand and contract.

Eric spaces out the boards for the "river" to fit.

Mike freehand routes the edge of the wood.

Fitting the glass into the routed area.
Class Day - Sunday
On Sunday, Brendan gave instruction on building the legs of the tables. First, Mike and Eric put the glass in their tables and pushed the halves together. This allowed them to get the final dimensions of their tables, depending on the width of the original board and the glass “river” that was added between the two sides.
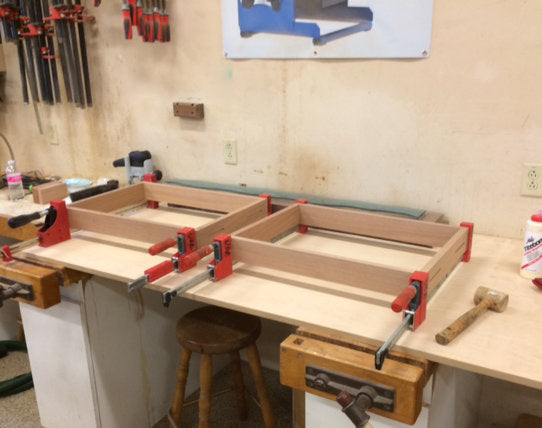
The table legs were constructed like a frame using 1ʺ x 3ʺ stock dominoed together in the corners to make a box. Using a ¾ʺ straight bit and a ¼ʺ spiral bit, a groove was routed out for a bolt head and through slot for the bolt shaft, on the boards being used as the top frame edges. This groove was created to hide the bolts that attach the frame to the underside of the table, allowing for expansion and contraction of the wood. Brendan said, “These tables have a lot of natural movement to them, especially with big slabs of wood like these.”
Each frame uses four threaded insert bolts to hold the tabletop. In the photo at right, you can get a clearer view of the groove and its placement in relation to the tabletop boards. Mike has one side clamped in place so he can mark the locations for the inserts, while Eric’s table shows both sets of table legs on and the “river” in place.
Mike’s walnut table gives us a nice shot of the visual break that was created by making a small rabbet around the edges and all four sides of the table. This shadow line makes the tabletop appear to be floating above the frame and adds a professional touch to the finished product.
After a final sanding on all wood surfaces using a random-orbit sander, the tables were nearly completed.
Due to time constraints and drying times, the students will apply the final finish of their choice at home. Brendan covered the types of finishes and their application in class. He explained, “When you have a highly figured wood, a nice Danish oil really enhances the look of the grain.”


The groove hides the bolts that attach the frame.

Both legs on and the "river" in place.

All that's left to do is add finish!
 The Finished Project
At the end of the River Table class, Mike Maldrow (left) and Eric Bridenbecker (right) stand behind their work looking pretty pleased with their results, and rightfully so. Mike’s walnut table was created as more of a side table, whereas Eric’s shorter and wider version is designed as a coffee table.
The customized selection of wood and final design, along with the individual attention from the instructor, made this class well worth the cost to these happy students. At a fraction of the retail for the pricy ones, making your own is a lot more satisfying too.
Classes vary at each Woodcraft store location – check out what is happening in your area and see what strikes your fancy. Will you build a table, make a knife, turn a bowl or carve a Santa? Woodcraft can help you build your skills.

We hope you’ll be inspired!


